Temporarily assemble the top cover
Continued with the original top cover for Motocompo. Since I was able to drill holes, I decided to assemble it once before painting and check if it could be installed properly.
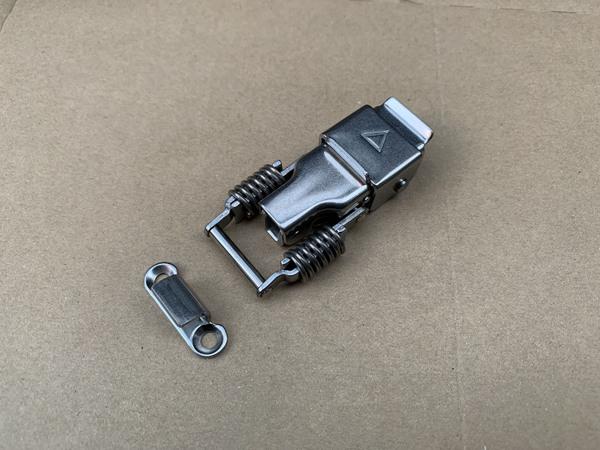
The material of the top cover is 3mm thick PVC board. At the four corners, attach lock fittings with springs to fix it to the cowl.
A spring-loaded lock fitting that secures the top cover. Hook the arm to the keeper and snap it closed to lock
The metal fittings are divided into the main part and the part called the keeper that hooks the arm. 4 sets of 16 screws are required as each is secured with 2 screws. The hardware I purchased didn't come with screws, so I searched around for a screw storage case at home and picked up something that looked like a good size.
First, let's attach the keeper to the cowl. The size of the screw is M4 with a diameter of 4 mm, and it is a countersunk screw with a flat head.
Secure the keeper with a 12mm long M4 countersunk screw
I chose a 12mm long screw to secure the keeper. Insert the screw from the front and attach the nut to the back to fix it.
I was going to use a washer and a spring washer to prevent loosening, but when I looked at the back side of the cowl, it was a loose V shape and it was just barely enough to fit the nut.
Actually, I couldn't even push the nut all the way in, let alone the washer. So I will stop using washers and use only nuts.
I tried to fit the nut on the back side of the cowl. It's in a state of floating a little without entering any more, but is it okay as it is?
I forgot to take a picture of the installation, so I snapped it before painting. The cowl is narrow, but it fits nicely
The nut is floating 2-3mm, so it might be better to cut the cowl and put it in properly, but it's pretty tight, so I'm going to leave it as it is. If it loosens, you should think about countermeasures at that time.
Abandoning spring washers for the metal fittings of the main body
I thought about fixing the metal fittings to the PVC board with 12mm screws, but they were not enough, so I used 10mm screws.
Use a 10mm M4 countersunk screw to fix the metal fitting.
The main body of the bracket is quite heavy, so you want to attach it more firmly than the keeper. Therefore, I decided to use washers and spring washers, so I took them out of the screw storage case.
Open the bracket and fix it with two screws. no problem on the front side
However, when I tried to install it, the screws were not long enough. Far from the spring washer, it's short even with the washer.
There is a problem with the back. Just put the washer in and the length of the screw is just barely. spring washer not included
Originally, it would be nice if the screw protruded a little from the nut, but it ended up being a little dented. Forget the spring washer. This is also the same as the keeper, so if by any chance it comes loose, I would like to replace the screw with a longer one.
Failure again with the mounting position...
Once the metal fittings are attached, place the PVC plate on the cowl. It feels good when you close the metal fittings with a snap! ...... I would like to say, but here again a mistake has been discovered. The metal fittings are loose and the PVC board moves rattlingly.
Since this metal fitting is used to securely close the switchboard door, etc., it is originally designed to snap closed when the arm is hooked to the keeper.

But this time it's attached to plastic. I thought that the cowl might crack if I pulled it too hard, so I installed it so that it would be quite loose. Fix the bracket body and the keeper 5mm closer than they should be. Apparently it was too close.
The metal fittings are too close to each other, and the arm is just barely caught on the edge of the keeper.
I had intended to make the arm loose enough to keep it from coming off the keeper, but the arm was barely caught on the keeper and it was too loose.
At this point, the metal fittings will be noisy and scratched, so use a drill to widen the mounting holes of the PVC board vertically and separate the metal fittings from the keeper.
I widened the screw holes and moved the metal fittings inside. I'm holding on tighter this time
I repeated attaching and enlarging the hole several times, and it felt good when the size of the hole was increased by about 3 mm. After all, it seems that it was enough to bring it 2mm closer than the original mounting position. Since the diameter of the hole was 4.5mm, it became a vertical hole of 4.5mm x 7.5mm.
The adjustment of the top cover is complete.
I tried to attach all the metal fittings again and this time it was fine. Does not rattle. After all, I tried it and it was the correct answer.
Paint the metal fittings and screws
Then paint.
The genuine top cover is black, and there are many black parts such as the frame and wheels, so black is fine, but the same color as the cowl is attractive. So, for the third time, we'll be featuring the SAND color of the US military spray paint "KRYLON CAMOUFLAGE" that we used to paint the cowl and fenders.
KRYLON's SAND is the same color as the cowl
In US military vehicles, the metal fittings are also painted in the same color, so I imitate and paint the metal fittings with sand. Since it is metal, spray the primer "Mitchakuron Multi" used when painting the fender on the base to improve adhesion.
Mitchakuron Multi prevents paint from peeling off
Remove oil and dirt with a degreaser before painting. You don't need to polish the feet, so it's OK if you line up the metal fittings and spray them.
Arrange them on cardboard and spray them with Mitchakuron Multi.
After a 30 minute break to dry the Mitchakron Multi, work resumes. Next, blow KRYLON CAMOUFLAGE.
Oh yeah, don't forget to paint the screw heads too. The screws are sometimes unpainted even by the U.S. military, but since the car body is small, it looks conspicuous, so I paint it.
Not only metal fittings but also screws are painted. Clipped and painted
You only have to paint the head of the screw, but you have to paint the six sides of the metal fittings, so spray it on, dry it, and turn it over and over again. Luckily, KRYLON CAMOUFLAGE dries quickly, and after about 15 minutes it becomes unsticky, so I finished painting it in about an hour and a half.
About an hour after painting, it becomes sticky to the point that you can touch it or place it here and there. Less likely to get scratched. Don't be impatient with painting, so let's wait a week.
After applying surfacer to the PVC plate
For the PVC plate, before painting, I sprayed the gray surfacer that I used when painting the cowl.
Based on the same number 1000 surfacer as the cowl
When I painted the front fender, I sprayed the transparent Mitchakuron Multi because the paint didn't seem to stick to the material, but I didn't use the surfacer.
KRYLON CAMOUFLAGE seems to have a strong hiding power, and it didn't darken the color even when applied over black, but the top cover is right next to the cowl. Even if the color is slightly different, the difference may be noticeable, so I decided to paint it in the same way as the cowl just in case.
Two coats of surfacer
If you apply the surfacer twice, it will be the same gray color as the base of the cowl. With this, you don't have to worry about color difference.
3 coats of KRYLON CAMOUFLAGE
KRYLON CAMOUFLAGE was applied in three coats. If you apply it in only one direction, the color tends to be uneven, so once you have applied a thin layer to the entire surface, apply it horizontally, and finally apply it vertically. You can't see the back, so don't paint it. It's shoddy.
Next time is finally complete!?


![Customized items for the new "Toyota Noah / Voxy" appear from Modellista [Tokyo Auto Salon 2022] [News]](https://website-google-hk.oss-cn-hongkong.aliyuncs.com/drawing/article_results_9/2022/3/28/2fb1fdedaad7536dd6271db30561f588_0.jpeg)
![[New Toyota Voxy (90 series)] Amplifies the characteristics of the aero body! A design that further enhances the power of the front mask! #Works direct custom deep layer 001](https://website-google-hk.oss-cn-hongkong.aliyuncs.com/drawing/article_results_9/2022/3/25/01568e2fbf021c0eaf7d013507c850a4_0.jpeg)

![[Toyota Noah / Voxy new model] Modellista releases various customized parts ... Actual vehicle exhibited at Tokyo Auto Salon](https://website-google-hk.oss-cn-hongkong.aliyuncs.com/drawing/article_results_9/2022/3/25/8268612c1e5941e62d3dfd07f8991b2f_0.jpeg)
