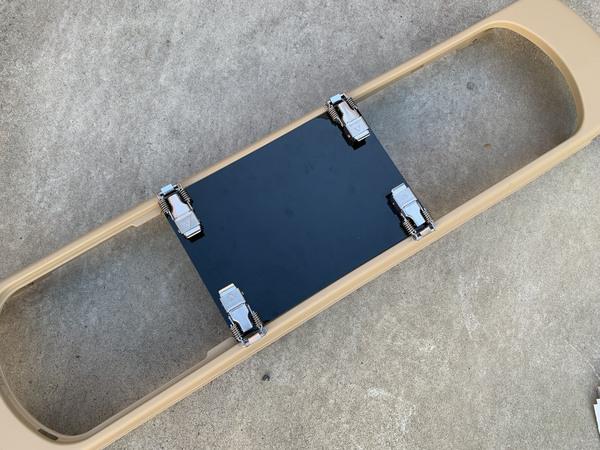
The material is PVC board, metal fittings, and soundproof tape.
Last time, in order to make my own Motocompo top cover, I procured PVC boards, metal fittings, and soundproof tape as materials (307th "I collected materials to make a used Motocompo top cover").
Purchased a PVC plate, 4 spring-loaded metal fittings, and soundproof tape as materials for the self-made top cover.
The main part is a 3mm thick PVC board. I bought a 300mm x 200mm plate and cut it to 278mm x 190mm with a plastic P-cutter. The color of the material is glossy black, so I will paint it later.
A lock bracket with a spring is used to fix the cover. Attach it to the four corners of the PVC board. The metal fittings I purchased were originally for fixing the doors and lids of switchboards and measuring instruments, and thanks to the springs on the left and right, they can be tightly sealed and are resistant to vibration.
Ordinary lock fittings simply hook the arm part and close it with a click, but since it has a slide-type lock, it does not open without permission. It's obviously over-engineered, but I'm worried about the ruggedness.
The soundproof tape is for height adjustment. The genuine top cover has a thickness of about 9 mm, while the PVC board has only 3 mm, so it is used to increase the height.
Stick the soundproof tape on the PVC board
The genuine top cover is designed to fit the claws in 4 places into the holes of the cowl and fix it.
The genuine top cover has claws that fit into the four holes in the protruding part inside the cowl.
Since the PVC board is placed on the cowl and fixed with metal fittings, this hole is not used. The board itself is just put on the cowl. However, while the thickness of the genuine top cover is about 9 mm, the thickness of the PVC board is only 3 mm, and if you put it as it is, there will be a step between it and the cowl.
If you put it on as it is, there will be a step between it and the cowl, so put a soundproof tape on the back.
That's where soundproof tape comes in. At first, I was thinking of stacking two pieces of PVC board and pasting them together to make 9mm, but it is difficult to cut the pieces further, so I bought a sponge soundproof tape that can be cut with scissors at 100%. .. Stick this on the back side and adjust the thickness.
If you think about it, it's natural, but if you put the plastic cover on the plastic cowl, it will rattle, so it comes with a nice bonus that the soundproof tape is 100 times better.
The length was cut according to the actual product. First, insert the genuine top cover into the cowl and mark the position of the front end with a pencil. After removing the top cover, align the soundproof tape with the mark position and cut. When I measured it, it was about 32 mm.
Since the back side uses the entire protruding part of the cowl, the length is the same as the total length of that part. This was 78mm.
Cut 100 average soundproof tape to the required size. There are 8 sheets because 2 sheets are stacked
This tape is 3mm thick like the PVC board, so it should be just the size if you stack two sheets. Cut out a total of 8 sheets, as 2 sheets will be stacked in 2 places before and after.
Attach soundproof tape to the four corners according to the corners.
When you're ready, remove the backing paper of the tape and put it on the four corners of the PVC board. I will put another one on top of the pasted tape.
And another one.Paste two sheets in the same place
By the way, when I put this soundproof tape on top of the tape, it feels like it's easy to peel off. I'm sorry to despise you.
Plus 6mm, perfect for height.As planned
When I put it on the cowl again, the step disappeared brilliantly. It is almost the same height.
Draw a diagram of the screw holes
Next, decide the mounting position of the metal fittings.

One set of metal fittings, the main body and the keeper
Attach the metal fitting body to the PVC plate, and attach the part called the keeper that hooks the arm to the cowl.
The front and back position is around here
I fitted a PVC board into the cowl, placed metal fittings, and checked the mounting position. I feel that it is better to move it to the center rather than completely in the four corners. I thought that the metal fittings were too big, but when I put them down, it might not be so.
I drew a simple diagram to make a screw hole
Both the metal fitting body and the keeper are fixed with two screws. The screw mounting position is specified by the manufacturer, and the distance between the two metal fittings is 14 mm and the keeper is 22 mm. The distance between the main body and the keeper screws is 31 mm.
When I measured the position of the center line of the metal fittings I placed, it was about 30 mm from the edge of the PVC board, so I drew a simple mounting hole drawing based on that. Make holes as shown in this figure.
Even though I wrote the figure, I made a painful mistake
Since it is 30 mm from the edge of the PVC board, the center line of the metal fitting will be 30 mm behind the position of the front edge of the top cover marked on the cowl earlier. And 11mm on each side from there is the center of the screw hole.
Mark the cowl for drilling. The line to the left of the hole is the front end of the top cover ...
Draw a center line on the cowl while measuring with a ruler. However, I made a terrible mistake here again. For some reason, I thought that the line drawn 19mm from the end was the center line of the metal fittings. It's the center of the screw hole on the front side ...
What on earth are you doing when you draw the figures yourself and write the numbers? Of course, the mark at the hole position has shifted forward by 11 mm, but I haven't noticed it at all at this time.
Make a small dent to prevent the drill bit from slipping.
And I made a hole without noticing it.
Gradually increase the hole to the required size
Use an electric drill to make holes. At this time, if I suddenly hit the blade of the drill, it would slip and the position would shift, so I made a dent with the center punch, but I could not find it, so I made a small hole with a design knife. If I noticed the mistake here, I could make a slight dent, but I was able to correct it, but I haven't noticed it at all.
The screws used are M4 countersunk screws. It is a screw with a diameter of 4 mm, a flat head and a conical shape under the head. The screw holes should be 4.5 mm, which is slightly larger than 4 mm.
First make a small hole and gradually increase it.
Even if you suddenly try to make a hole with a thick blade, the blade will not bite or shift, so first make a small hole and gradually increase it.
Initially 1.5 mm in diameter. This was my last chance to notice the mistake, but I made holes in two places. I can't go back anymore.
The holes are gradually expanded to 2 mm, 2.5 mm, and 3 mm by switching to thicker blades. 1mm unit may be enough, but I don't like it if I fail, so I went carefully in 0.5mm unit. I have already failed in the drilling position ...
Finally, make a hole with a 4.5mm drill and you're done. In the same way, I made two holes in each of the other three places.
I notice a mistake when trying to make a hole in a PVC board
Next is the drilling of the PVC board.
Insert the PVC plate into the cowl so that the holes are not in the wrong position, and draw the center line of the main body metal fittings according to the center line of the keeper drawn on the cowl.
The depth direction is specified as 31 mm from the keeper's mounting hole, but this should be supposed to close metal doors etc. tightly. If you pull the plastic strongly, it will crack or distort, so I added 5mm to 36mm. It feels like it gets caught loosely.
... and I felt something was wrong here. It should be 30mm from the edge of the PVC board to the center line, but it is not so much by any means. When I measure it, the distance is 19mm. I finally noticed that the position of the hole and the center line were mistaken.
But I've already made a hole in the cowl, so I can't help it anymore. It would be a big deal if it was a job or a request. However, this time I use it myself, so if I'm satisfied with it, there's nothing wrong with it, so I thought I was planning to put it in this position from the beginning.
After making a dent on the PVC board with a design knife, drill a hole in the same way.
Make a hole in the PVC board.I've never seen it in the wrong position
Make two holes for each metal fitting, for a total of eight holes.
Drilling is complete!
That's why it's safe ... but that's all for drilling. Next time, I'd like to try assembling it to see if there is anything wrong with it, and then start painting.


![Customized items for the new "Toyota Noah / Voxy" appear from Modellista [Tokyo Auto Salon 2022] [News]](https://website-google-hk.oss-cn-hongkong.aliyuncs.com/drawing/article_results_9/2022/3/28/2fb1fdedaad7536dd6271db30561f588_0.jpeg)
![[New Toyota Voxy (90 series)] Amplifies the characteristics of the aero body! A design that further enhances the power of the front mask! #Works direct custom deep layer 001](https://website-google-hk.oss-cn-hongkong.aliyuncs.com/drawing/article_results_9/2022/3/25/01568e2fbf021c0eaf7d013507c850a4_0.jpeg)

![[Toyota Noah / Voxy new model] Modellista releases various customized parts ... Actual vehicle exhibited at Tokyo Auto Salon](https://website-google-hk.oss-cn-hongkong.aliyuncs.com/drawing/article_results_9/2022/3/25/8268612c1e5941e62d3dfd07f8991b2f_0.jpeg)
